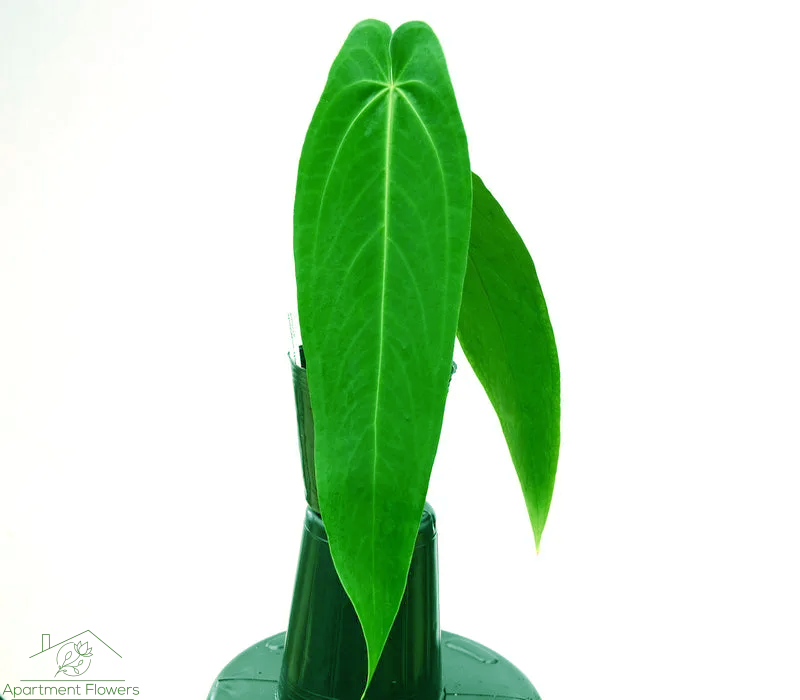
Anthurium warocqueanum, commonly known as the Queen Anthurium, is a prized gem in the world of tropical houseplants. Originally came from the rainforests of Colombia, its velvety leaves and striking appearance make it a must-have for plant enthusiasts. This comprehensive Queen Anthurium care guide provides insights into nurturing this regal plant, ensuring it remains the centerpiece of your indoor garden.

Anthurium Warocqueanum Care:
Known for its elongated, velvet-leaved texture, proper Anthurium Warocqueanum care ensures the leaves maintain their majestic appeal. The primary aspects of care involve light, water, humidity, and soil conditions.
| Anthurium Warocqueanum: Propagation, Grow & Care Guide | |
|---|---|
| Scientific Name | Anthurium Warocqueanum |
| Common Name | Queen Anthurium |
| Origin | Colombian rainforests |
| Light Needs | Bright, indirect light; avoid direct sunlight |
| Watering | Allow top inch of soil to dry between waterings |
| Soil Requirements | Well-draining mix of orchid bark, perlite, and peat moss |
| Humidity | Above 60%; use a humidifier or pebble tray for best results |
| Propagation | Via stem cuttings with 2-3 nodes or division |
| Repotting | Every 2-3 years or when outgrowing its pot |
| Pests & Diseases | Watch for mealybugs, aphids, spider mites; use insecticidal soaps or neem oil as prevention and treatment |
| Pruning | Remove yellowed or damaged leaves for aesthetic & health |
Anthurium Warocqueanum Light Needs:
The Anthurium Warocqueanum, with its stunning velvet-textured foliage, has specific light requirements that are pivotal to its optimal growth. Originating from the dense rainforests of Colombia, it’s accustomed to dappled sunlight filtering through the canopy above. Therefore, when cultivating this plant indoors, it thrives best in bright, indirect light. Exposing it to direct sunlight, especially during peak hours, can scorch its delicate leaves, leaving unsightly blemishes. On the other hand, insufficient light can result in leggy growth and diminished vibrancy. For ideal results, placing it near an east or north-facing window, or using sheer curtains to diffuse direct sunlight, can emulate its natural habitat and ensure a healthy, radiant Queen Anthurium.
How to Water Queen Anthurium:
When it comes to growing Anthurium Warocqueanum indoors, water is crucial. Ensure the top inch of the soil is dry before watering, ensuring that the plant doesn’t sit in water. Overwatering can lead to root rot.
Humidity for Anthurium Warocqueanum:
Originating from tropical regions, this plant loves moisture. It prefers humidity levels above 60%. If you’re in a drier region, consider using a humidifier or placing the plant atop a pebble tray filled with water.
Anthurium Warocqueanum Soil Requirements:
Anthurium Warocqueanum’s unique soil requirements are a testament to its epiphytic origins in the Colombian rainforests, where it often grows on tree trunks, deriving nutrients from organic matter in its vicinity. To replicate this environment, the Queen Anthurium necessitates a well-draining soil mix, ensuring its roots receive adequate oxygen while minimizing the risk of root rot. A blend of orchid bark, perlite, and peat moss or coconut coir is often ideal, providing both the aeration and moisture retention this plant craves. Additionally, integrating charcoal or worm castings can further enrich the mix, fostering a supportive environment for robust root development and overall growth. Ensuring the pot has adequate drainage holes further accentuates the soil’s efficacy, guaranteeing the regal Anthurium Warocqueanum thrives in conditions reminiscent of its native habitat.
Repotting Anthurium Warocqueanum:
Typically, this regal plant should be repotted every 2-3 years as mentioned before or when it visibly outgrows its container. When undertaking this task, it’s crucial to select a container that is only slightly larger (about 1-2 inches in diameter) than the current one to avoid overwhelming the plant with excess soil, which can retain more water and potentially lead to root rot. A well-draining potting mix, tailored to its epiphytic nature, as discussed in the soil requirements, is essential. During repotting, gently tease out the roots and inspect for any signs of rot or disease, trimming away unhealthy sections. Position the plant so its crown is at or just below the soil surface. Post-repotting, water lightly to settle the soil, ensuring a smooth transition for the Anthurium Warocqueanum to its new abode.
Queen Anthurium Propagation:
Queen Anthurium propagation can be achieved through stem cuttings or division. Cuttings should have 2-3 nodes and be allowed to air dry for several hours before planting. Division involves gently separating the plant into smaller sections, ensuring each has roots attached.
Anthurium Warocqueanum Pests and Diseases:
Watch out for common pests such as mealybugs, aphids, and spider mites. Regular inspections and treatments using insecticidal soap or neem oil can keep these nuisances at bay.
Anthurium Warocqueanum Pruning Tips:
To maintain its magnificent appearance, occasional pruning is beneficial. Remove any yellowed or damaged leaves using sharp, sanitized scissors.
Velvet-Leaved Anthurium Care & Comparison:
While Anthurium Warocqueanum vs. other Anthurium species might display some differences in care, their general needs remain similar. Their velvet-leaved characteristic is shared among a few species, which all require high humidity and indirect light.
Conclusion
Armed with these tropical houseplant care tips, you are well on your way to successfully nurturing an Anthurium warocqueanum. Remember, each Anthurium species identification has nuances, but the essence of their care remains rooted in their tropical origins. Treat your Queen Anthurium with the royal care it deserves, and it will reward you with unmatched beauty for years to come.
READ MORE:

