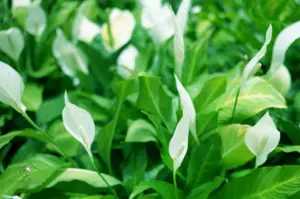
The Peace Lily, scientifically recognized as Spathiphyllum, stands out as a favorite among indoor plants. Its elegant white blossoms and vibrant green foliage have made it a beloved addition to countless homes. However, like any living organism, the Peace Lily is not without its vulnerabilities. In this blog post, we’ll delve deep into recognizing and addressing the issues this plant might face.
Identifying the Symptoms of a Struggling Peace Lily
Peace Lilies are revered for their graceful appearance and adaptability to indoor environments. Still, even the most robust of plants can face occasional hiccups. Recognizing the early signs of distress in your Peace Lily can mean the difference between timely intervention and irreversible damage. Let’s delve deep into the various symptoms a struggling Peace Lily might exhibit and decode their underlying causes.
1. Yellow or Browning Leaves
Causes and Remedies:
- Overwatering: Consistent overhydration can lead to yellow leaves. Ensure that your pot has proper drainage and let the top layer of the soil dry out between waterings.
- Excessive Light: Too much direct sunlight can scorch the leaves. Move the plant to a location with bright, indirect light and consider using curtains to filter out harsh rays.
- Nutrient Deficiency: If your Peace Lily has been in the same soil for a long time, it might be nutrient-starved. Consider repotting with fresh soil or introducing a balanced, water-soluble fertilizer.
2. Droopy or Wilted Appearance
Causes and Remedies:
- Underwatering: If the soil feels dry and the plant is wilting, it needs hydration. Water thoroughly until excess moisture seeps out from the bottom, ensuring the roots are adequately moistened.
- Root Rot: A consequence of overwatering, roots become mushy and ineffective at nutrient uptake, leading to a droopy plant. If suspected, remove the plant from its pot and inspect. Prune away rotten roots and repot in fresh, well-draining soil.
3. Absence or Reduction of Flowering
Causes and Remedies:
- Insufficient Light: While Peace Lilies can tolerate low light, they won’t produce flowers without adequate light. Relocate your plant to a brighter spot but avoid direct sunlight.
- Lack of Nutrients: Fertilize your Peace Lily with a balanced indoor plant fertilizer during its growing season to encourage blooming.
4. Signs of Pests or Diseases
Causes and Remedies:
- Pests: Spider mites, aphids, and mealybugs are common culprits. They can cause discoloration, spots, or even a sticky residue. Address these pests by cleaning the leaves with insecticidal soap or a neem oil solution.
- Diseases: Fungal infections, often due to excessive moisture on leaves or in soil, can manifest as black or brown spots. Ensure adequate airflow around the plant, use well-draining soil, and avoid wetting the leaves when watering.
By keenly observing your Peace Lily and understanding its symptoms, you can decode its needs and intervene promptly. Plants often communicate their distress through subtle changes. The key lies in being attentive, knowing what to look for, and acting with knowledge. With the right care, your Peace Lily can continue to thrive, showcasing its lush green leaves and pristine white blooms.
Addressing Watering Issues: Striking the Perfect Balance
The Peace Lily, with its lush green foliage and radiant white blooms, often captures the hearts of plant enthusiasts. However, its allure can be diminished if not watered with a delicate balance. Too much or too little water can both be detrimental. In this segment, we’ll meticulously address the watering challenges and provide a roadmap to ensure your Peace Lily thrives.
Signs of an Overwatered Peace Lily
Causes and Remedies:
- Yellowing Leaves: Overwatering can cause the leaves to turn yellow as the roots begin to drown and become inefficient in nutrient uptake.
- Soggy Soil: Consistently wet soil can become compacted, reducing oxygen for the roots. Always ensure the pot has adequate drainage holes.
- Root Rot: One of the dire consequences of overwatering, the roots become brown, mushy, and emit a foul odor. If you suspect root rot, remove the plant gently, trim away affected roots, and repot in fresh, well-draining soil.
Tip: Use pots with saucers to prevent any waterlogging. Empty the saucer regularly.
Signs of an Underwatered Peace Lily
Causes and Remedies:
- Droopy Leaves: When underwatered, the Peace Lily’s leaves will droop noticeably. However, it’s important not to confuse this with its evening “sleep,” where a mild droop can be observed.
- Dry Soil: If the top 1-2 inches of soil feels dry to touch, it’s a sign your plant needs water.
- Brown Leaf Tips: Chronic underwatering can cause the tips of leaves to turn brown. Regularly check the soil’s moisture to prevent this.
Tip: Consider investing in a soil moisture meter. It takes the guesswork out of watering and can be invaluable for beginners.
Tips for Maintaining Optimal Peace Lily Soil Moisture
Recommendations:
Use a well-draining potting mix, preferably one designed for tropical houseplants. This ensures moisture retention without waterlogging.
When watering, do so thoroughly. Ensure water reaches the bottom of the pot, and excess drains out.
Peace Lilies generally need watering once a week, but this can vary based on room temperature, humidity, and pot size. Always check soil moisture before watering.
Peace Lilies can be sensitive to chemicals found in tap water. If possible, use distilled or rainwater. If using tap water, letting it sit for a day can help in evaporating some of the chemicals.
While it might seem intricate at first, understanding the watering needs of your Peace Lily becomes intuitive over time. The secret lies in observing your plant, understanding its signals, and responding with care. By striking the right balance, not only will you be safeguarding the health of your Peace Lily but also ensuring that its beauty remains undiminished for years to come.
Understanding and Meeting Light Requirements
The radiant Peace Lily, known for its captivating white blooms and verdant leaves, thrives when given the right amount of light. Light plays a pivotal role in photosynthesis, a process that allows plants to create food. However, finding the right balance of light is akin to providing it with a well-balanced diet. Too little and it starves; too much and it can suffer. In this section, we’ll illuminate the intricacies of the Peace Lily’s light needs, helping you create an environment where it flourishes.
Natural Light Preferences of Peace Lily
Key Points to Consider:
- Bright, Indirect Light: A Peace Lily’s natural habitat is the understory of tropical forests. This means while it is used to receiving light, it’s often filtered through the dense canopy above. In your home, this translates to bright, indirect light being ideal.
- Tolerance to Low Light: While they can handle lower light conditions and might still grow, their blooming might be limited. If your Peace Lily isn’t producing flowers, insufficient light could be a reason.
- Avoid Direct Sunlight: Direct sunlight, especially during the peak hours, can scorch the sensitive leaves of the Peace Lily, leading to sunburns that manifest as yellow or brown discolorations.
Consequences of Incorrect Lighting
Problems and Solutions:
- Too Much Direct Sunlight: This can cause leaf burn, evident from yellow or brown crispy patches on the leaves. If noticed, relocate your plant away from the direct light source immediately.
- Insufficient Light: A Peace Lily deprived of light will exhibit stunted growth, fewer flowers, and can become leggy as it stretches towards the light source. To remedy, move it to a brighter location.
Positioning Within the Home
Guidelines and Recommendations:
- Near Windows: A north-facing window is often ideal as it provides consistent indirect light. However, east or west-facing windows can work if you use sheer curtains or blinds to diffuse the sunlight.
- Away from Direct Sun Rays: If you have south-facing windows, place the Peace Lily a few feet away or use curtains. This ensures it gets bright light without the harmful direct rays.
- Rotating the Plant: Every few weeks, rotate your Peace Lily to ensure all sides receive equal light exposure. This promotes even growth.
Artificial Lighting Solutions
Options for Indoor Environments:
- Fluorescent Lights: These can be a good alternative or supplement to natural light, especially during darker months. Place the plant about 6-8 inches away from the light source.
- LED Grow Lights: Efficient and long-lasting, they provide a broad spectrum of light that can benefit your Peace Lily. Ensure the light isn’t too intense and maintain a reasonable distance between the plant and the light source.
Soil, Nutrition, and Repotting
The foundation of any thriving plant is rooted in the soil it’s planted in. For the Peace Lily, a plant renowned for its stunning white spathes and lush foliage, the right soil mix, nutrition, and timely repotting are essential. These factors not only anchor the plant but also nourish and allow it to flourish. In this section, we’re digging deep into the importance of soil, nutrition, and the art of repotting, ensuring that your Peace Lily remains the centerpiece of your indoor garden.
The Ideal Soil Mix for Peace Lilies
Key Ingredients and Benefits:
- Well-Draining Potting Mix: At its core, a Peace Lily requires soil that retains some moisture without becoming waterlogged. Look for a mix that’s made for tropical or indoor plants.
- Peat Moss or Coconut Coir: These components help retain moisture while offering aeration. They ensure that the plant’s roots can breathe while accessing the necessary hydration.
- Perlite or Sand: To prevent compaction and improve drainage, additives like perlite or sand are essential. They help maintain soil structure, especially crucial for plants susceptible to root rot.
Nutrition: Feeding Your Peace Lily
Importance and Recommendations:
Balanced Fertilizer: Peace Lilies aren’t heavy feeders, but they do benefit from occasional fertilization. A balanced, water-soluble fertilizer, applied every 6-8 weeks during the growing season, is often adequate.
Avoid Over-fertilizing: Overfeeding can lead to salt buildup, manifesting as brown leaf tips. Always follow label instructions and, when in doubt, err on the side of under-fertilizing.
Flushing the Soil: Every few months, especially if you notice slowed growth or browning tips, flush the soil with distilled or rainwater to leach out any excess salts from fertilizers.
Repotting: When and How
Guidelines and Benefits:
Signs It’s Time: If your Peace Lily appears root-bound, with roots emerging from the drainage holes, or if it’s drying out too quickly, it’s time to consider repotting.
Choosing the Right Pot: Opt for a pot that’s 1-2 inches larger in diameter than the current one. Ensure it has sufficient drainage holes.
The Repotting Process:
- Preparation: Water your Peace Lily a day before repotting. This makes the process less stressful for the plant.
- Removal: Gently remove the plant from its current pot. Inspect the root system and trim any brown or mushy roots.
- Planting: Add some fresh soil mix to the new pot. Position the Peace Lily and fill around it with soil, pressing gently to eliminate air pockets.
- Aftercare: Water lightly and place the repotted plant in a shaded location for a few days to help it acclimate.
Humidity and Temperature: Creating an Ideal Environment
Originating from the tropical rainforests of Central and South America, the Peace Lily’s very essence is intertwined with a humid and warm environment. Its luscious green leaves and pristine white blooms aren’t just a testament to its beauty, but also a reflection of its inherent need for specific humidity and temperature conditions. In this section, we’ll guide you through the process of recreating this native habitat within the confines of your home, ensuring your Peace Lily not only survives but thrives magnificently.
The Significance of Humidity for Peace Lilies
Why It Matters:
Natural Habitat Recall: In the rainforests, high humidity is a given. For the Peace Lily, this moisture-laden air ensures that its leaves remain hydrated, preventing them from drying out or wilting.
Optimal Growth: Adequate humidity levels can significantly boost growth, encouraging the plant to produce more of its iconic blooms and vibrant green foliage.
Signs Your Peace Lily Needs More Humidity
Indicators and Solutions:
- Brown Leaf Tips: One of the earliest signs of inadequate humidity is the browning of leaf tips. This is the plant’s way of signaling that the air is too dry for its liking.
- Drooping: Even with proper watering, a Peace Lily may droop if the air lacks moisture. This wilting can be more pronounced during winter when indoor heating systems dry out the air.
A Tip: Regular misting, placing a humidifier near the plant, or creating a humidity tray by placing the pot atop a tray filled with pebbles and water can help counteract dry conditions.
Temperature Needs: Striking the Right Balance
Guidelines and Recommendations:
- Ideal Temperature Range: Peace Lilies prefer temperatures between 65°F (18°C) and 80°F (27°C) during the day. At night, a slight drop is acceptable but should remain above 60°F (15°C).
- Avoid Temperature Fluctuations: Rapid temperature swings can stress the plant. Ensure the plant isn’t placed near heaters, air conditioners, or drafty windows.
- Protection from Extremes: Never expose your Peace Lily to temperatures below 45°F (7°C). Such low temperatures can damage the plant and potentially be fatal.
Adjusting to Seasonal Changes
Adapting to Different Climates:
Winter Precautions: As indoor heating can reduce humidity and warmth, consider moving your Peace Lily away from radiators and frequently mist to counteract dryness.
Summer Care: While Peace Lilies love warmth, avoid placing them in locations where they might experience direct afternoon sun, which can raise temperatures to harmful levels.
Battling Pests and Diseases
Common Pests Targeting Peace Lilies
Identifying Culprits:
- Spider Mites: These tiny critters often appear when the air is too dry. They manifest as fine webbing between leaves and can cause leaf discoloration.
- Aphids: These small, soft-bodied insects are often found on new growth, sucking out plant sap and leading to deformed leaves and reduced vigor.
- Mealybugs: Resembling tiny cottony patches, they typically congregate in leaf axils and can cause leaves to yellow and drop.
- Scale: These flat, oval insects attach themselves to stems and leaves, sucking out the plant’s sap and causing wilting.
Signs and Symptoms of Diseases
Recognizing the Threat:
- Root Rot: Typically caused by overwatering and poor drainage, symptoms include yellowing leaves, wilting, and a musty smell from the soil.
- Leaf Spot Disease: Manifesting as brown or black spots with yellow halos, it’s often a result of fungal infection. High humidity without proper ventilation can exacerbate it.
- Powdery Mildew: Appearing as a white powdery substance on leaves, this fungal disease thrives in high humidity and poor airflow conditions.
Prevention and Treatment Strategies
Defensive Measures:
Neem Oil: A natural pesticide, neem oil can be effective against a range of pests. Regularly spraying a diluted solution can deter pests and even treat mild infestations.
Insecticidal Soap: Safe for plants but deadly for pests, this can be sprayed directly on most pests to eliminate them.
Proper Watering: Avoiding overwatering and ensuring proper drainage can prevent root rot. If detected, repotting with fresh, well-draining soil and trimming rotten roots is essential.
Isolation: If a new plant is introduced, keep it isolated for a couple of weeks to ensure it doesn’t carry pests or diseases that could spread.
Improve Air Circulation: Using a fan or regularly aerating your indoor garden can prevent many fungal diseases by reducing the humidity around your plants.
Regular Inspection and Maintenance
The Proactive Approach:
- Routine Checks: Periodically inspect the underside of leaves, stems, and the soil. Early detection is the key to managing and mitigating infestations or diseases.
- Pruning: Regularly removing dead or affected leaves can prevent the spread of diseases and also boost the overall health of the plant.
While the Peace Lily graces our homes with unparalleled beauty, it’s our duty to shield it from the onslaught of pests and diseases. Battling these threats is not just about reactive measures but proactive vigilance. By fostering a healthy environment, regularly inspecting for signs of distress, and acting swiftly at the first hint of trouble, you ensure that your Peace Lily stands tall, radiant, and triumphant against any adversary it might face.
If your Peace Lily is severely distressed:
Consider a thorough flush of the soil, trimming of extremely damaged parts, and placing the plant in a controlled environment.
Recovery can take time. Continue providing consistent care.
Every Peace Lily might have unique needs. Adjust care routines based on its response.
Conclusion
Peace Lilies are resilient, and with the right care, they can bounce back from adversity. Our journey through this post has provided you with a toolbox of solutions to revive your cherished plant. We encourage you to share your experiences, success stories, or questions below. Together, we can create a community of thriving Peace Lily enthusiasts!